Advanced Masks

Advanced Masks 1.1.0

Analytiq

New Member
Hi Analytiq-

I'm very glad to hear you're enjoying the plugin!

The issue you are talking about was actually one of my big original motivators for creating the plugin, and what you want to accomplish can absolutely be done, though it is an.. advanced use of advanced masks. ;) I really need to make a video tutorial about this, but I'll try to briefly explain how it can be accomplished.

Lets say you have 2 scenes- "Talking" and "Gameplay". In the talking scene, you want your "Facecam" source to be full screen, and in gameplay you want it to be shrunk down in the lower right corner with rounded corners. Here is how to do it (starting from scratch).
I am going to assume your facecam is 1080p and your canvas is 1080p, so you might need to adjust things if this is not the case).
  1. Create a new scene, name it "Talking". To this scene add your facecam video capture device (call it "Facecam").
  2. Create a new scene, name it "Gameplay". To this scene add the existing "Facecam" source you just created in step 1.
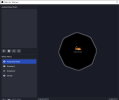
  3. Open the filters for "Facecam" and add an advanced mask filter. Set the width and height of the mask to 1920x1080px, 0px corners, no feathering. Check the "Scene view transformation" box, and leave everything at stock (960px, 540px, scale type percent, and scale 100%). This should leave your facecam full screen and unchanged.
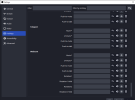
  4. Add a move value filter to the facecam source, and call it "Full Screen". Select "Advanced Mask" for the Filter, and select "Settings" for the Move Value Type. Then click the "Get Values" button to grab all of the current (full screen) values of the advanced mask filter. Set the duration, easing, etc.. to whatever you want.
  5. Click back on the advanced mask filter. Under the "Scene View Transformations" section, set the scale to say, 30% (to make your face cam smaller) then the position X and Y to the lower right corner (something like 1600px for X and 890px for Y if your canvas is 1080p). Once you position/scale it on the canvas, use the corner radius properties to set the corner radius to what you want in your gameplay scene.
  6. Add another move value filter to your facecam source, and call it "Lower Right" or something like that. Repeat what you did in step 3- set the filter to "Advanced Mask", Move Value Type to "Settings" then click "Get Values" and set the duration/easing/etc. You should now be able to click the eyeball on the "Full Screen" move value and the "Lower Right" move value to animate the change between the two. You can make as many of these positions as you want (say an upper left corner) and animate between any of them.
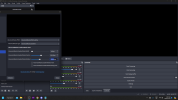
  7. Now that you've set all of your positions add a Move Action filter to your Gameplay *Scene*. The Action will be "Filter Enable", Source will be "Facecam", filter will be "Lower Right" (or whatever move value position you created that you want for the gameplay scene), and Enable will be "Enable". Scroll down in the move action settings, and set the Start Trigger to "Activate: When this filter becomes actively shown in the final mix".
  8. Now do the same for your "Talking" scene- add a Move Action filter to the Talking *Scene*, Action of "Filter Enable", Source of "Facecam", but for Filter select the "Full Screen" move action filter you created in step 4. Again, set the Start Trigger to "Activate: When this filter becomes actively shown in the final mix."
Now when you switch between your Gameplay and Talking scenes, you should get a nice animation between the two mask states. Again, you can add as many of these positions to the original source you want to mask, then just add a Move Action filter in each scene with that source, with the position/size mask you want for that scene.

Its not ideal, but is about the only way I could figure out how to make this all work. I hope this is helpful!
Hey, thank you so much for the detailed answer! Out of sheer luck Youtube ended up recommending a video to me a day later that showed how to use multi-actions (from a Streamdeck for example) to trigger the scene transition and move value together. It is working for now, but I will check out your approach to see if there is any noticable improvements in terms of maintainability. Thank you for the awesome help!

For others stumbling across this thread: https://youtu.be/NtmlIAfqBT4?si=6d6-FwRl1Sqd3Qn5 just replace the filter used with advanced masks and then use either the macro program or a streamdeck.
 

CowbanC

New Member
FiniteSingularity submitted a new resource:

Advanced Masks - Advanced alpha and color adjustment masks for sources and scenes.


Read more about this resource...
Great plugin - I haven't found anything to moan about!

Just a question.
The Advanced Mask doesn't appear in the hotkey list so I can't change the visibility 'remotely'.

Am I missing something?
Is it a normal feature of some plugins?

As you can see, the Stroke filter is also 'missing'
 

Attachments

  • OBS 30.1.1 - Profile_ Default - Scenes_ 2Pcs 02_04_2024 12_27_08.png
    OBS 30.1.1 - Profile_ Default - Scenes_ 2Pcs 02_04_2024 12_27_08.png
    31.8 KB · Views: 20
  • OBS 30.1.1 - Profile_ Default - Scenes_ 2Pcs 02_04_2024 12_26_43.png
    OBS 30.1.1 - Profile_ Default - Scenes_ 2Pcs 02_04_2024 12_26_43.png
    44.6 KB · Views: 19
Last edited:
Great plugin - I haven't found anything to moan about!

Just a question.
The Advanced Mask doesn't appear in the hotkey list so I can't change the visibility 'remotely'.

Am I missing something?
Is it a normal feature of some plugins?

As you can see, the Stroke filter is also 'missing'
Hi CowbanC-

Apologies for not replying sooner- I was out of town when you posted this, and didn't see the post until just now.

Hotkey support is something that needs to be manually added to plugins in code. I've added it to the Composite Blur plugin, and will be adding it in the next release of Advanced Masks and Stroke/Glow/Shadow. So expect to see it soon (within the next week or so for Stroke/Glow/Shadow, then soon after for Advanced Masks.)
 

puppydoll

New Member
is it possible to use this plugin to apply a scene with a scroll filter into a mask? my current testing is just adding a scroll to an image with the mask filter to another source's shape, which of course causes the problem that the scroll is well, scrolling that cut-out shape, not a scrolling background confined within the mask's shape.
 
If I am interpreting you correctly- you have some source that scrolls (lets say from left to right), and you want to mask it to some shape/image, where the scrolling happens under the mask? In that case, yes, advanced mask can do that. Create your scrolling content scene, and add an advanced mask filter to that scene. The mask will stay static, but your scrolling content scene should scroll behind it. (if I'm not interpreting you correctly, feel free to elaborate a bit more, I'm happy to try to help)
 

CowbanC

New Member
Hi CowbanC-

Apologies for not replying sooner- I was out of town when you posted this, and didn't see the post until just now.

Hotkey support is something that needs to be manually added to plugins in code. I've added it to the Composite Blur plugin, and will be adding it in the next release of Advanced Masks and Stroke/Glow/Shadow. So expect to see it soon (within the next week or so for Stroke/Glow/Shadow, then soon after for Advanced Masks.)
Many thanks
 

Christoffer_

New Member
Feature Request!

The Corner Radius Perspective needs to have an additional setting for applying the rounded corners at the total size of the source, or ad any size of the source (if cropped, for example).

– As for now, the Corner Radius Perspective apply only on the actual size of a source. When cropping a source (for example making a camera feed square or portrait shaped), those rounded corners are cropped away as well. Please correct me if I'm wrong and have misunderstood this, but I have tried to look through the settings and cannot find any solution to it. :)

It would be a really nice thing to have. There are cases where you just don't want mask images, for example when using the Move plugin and you want those cropping sizes to change during the transitions. They do that very beautifully, just not with rounded corners.

Cheers!
Hi Christoffer_,

Unfortunately, this is a limitation in how OBS compositing works. A filter has no access to the transformation (e.g.- cropping, resizing, etc..) data of a source. This is because that source can be in multiple scenes with different transformations (or even multiple times in a single scene with different transformations). Thus, there is no way for the filter to be able to mask things as you want natively.

However, this is why I built the "Scene View Transformation" option into the plugin. Scene view transformation allows you to crop/position your masked source within the plugin, rather than using the built-in scene/source transformations. Then you can set up a series of move value filters to animate the mask from one state to another, and add Move Action filters with an "Activate" start trigger to your scenes. Its a pretty complex workaround, but the only way I could find to make it work with how OBS currently does things.

I'll make a text/screenshot tutorial on how to do this later today and post it here.
 
@FiniteSingularity why not to encapsulate source into the Group and apply filter to the whole group? Thus, cropping of the source that is lies inside can be any. Isn't it easier?
It should work in a group as well, though depending on what you're trying to accomplish, you need to be careful about the group resizing itself as the transformation of things within the group change (if I'm interpreting you correctly).
 

MJ-UK

New Member
Feature Request!

The Corner Radius Perspective needs to have an additional setting for applying the rounded corners at the total size of the source, or ad any size of the source (if cropped, for example).

– As for now, the Corner Radius Perspective apply only on the actual size of a source. When cropping a source (for example making a camera feed square or portrait shaped), those rounded corners are cropped away as well. Please correct me if I'm wrong and have misunderstood this, but I have tried to look through the settings and cannot find any solution to it. :)

It would be a really nice thing to have. There are cases where you just don't want mask images, for example when using the Move plugin and you want those cropping sizes to change during the transitions. They do that very beautifully, just not with rounded corners.

Cheers!
Hi Christoffer - I'm very new to OBS and I had a similiar use case, where I wanted the rounded corners to apply to my cropped webcam when trasitioning from full screen presenter to presentation mode with picture in picture with a cropped webcam. What you might want to try is the move source filter.

Checkout this fantastic YT video by Andilippi - https://www.youtube.com/watch?v=NtmlIAfqBT4&t=650s which might be the type of thing you're trying to achieve. It's from about 3 years ago so he might have changed his hair colour now haha. Some of the plugins have changed since he recorded this. For example StreamFX is behind a paywall, but I managed to recreate this neat trick using a combination of the following plugins - Move and obs-shaderfilter by Exeldro | Composite Blur by FiniteSingularity | Advanced Scene Switcher by Warmuptill.

I've not tried using Advanced Masks with the Move Source filter but there's a very good chance this will work in a similiar way... I need to try this.

Cheers MJ
 
Top