General Overview
Each entry in the mixer is made up of 5 parts
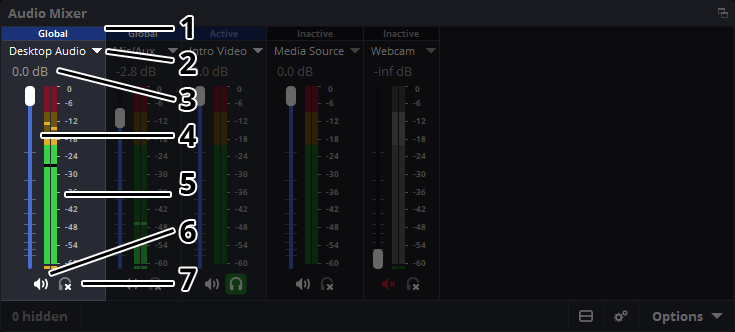
- Status - Information about the state of this audio source.
- Name - Name of the source
- Fader Level - The adjusted value of the source volume, measured in decibels
- Fader - Slider that controls the volume for the source
- Volume Meter - Visual bars that indicate the volume of the source
- Mute Button - A speaker icon to mute and unmute the source to your output
- Monitor Button - Allows playing the audio of the source back through your monitoring device, configured in Settings
Most of the time, you want to keep a close eye on the meters. The rest should be 'set once run forever'.
Reading the Volume Meter
Zones
The volume meter is made up of 3 primary sections signified by the green, yellow and red zones. The moving colored bars indicate the peak level of audio.
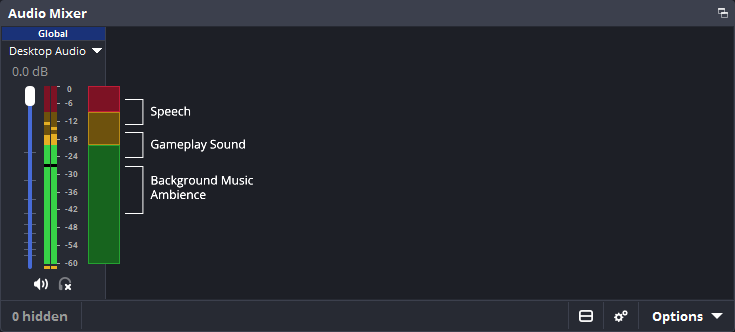
- Red Zone - Audio in this region is close to clipping. Audio like speech should reach the lower end of this area.
- Yellow Zone - Speech (your own & friends) should sit in the upper range with things like gameplay sound or other content towards the lower end.
- Green Zone - Everything else such as background music and alert sound effects should remain here
Clipping refers to the distortion that is heard when an audio signal cannot be accurately reproduced by the gear through which it is passing.
Note: Even if other sounds look to be the same volume as your voice, they may in reality sound louder to viewers. The small black bars give a good estimate of loudness. More info about the different indicators is below.
Channels
Each audio source will have at least one volume meter assigned to it.
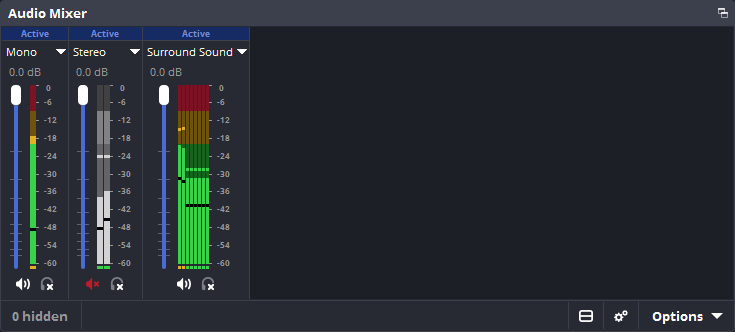
- (1 Channel) Mono source
- Viewers will automatically hear this in both left and right channels (headphones/speakers)
- (2 Channels) Stereo source
- Left is shown first, right second. Viewers will only hear these as they're assigned.
- If only the first meter lights up, your viewers will only hear that source in their left channel. You can enable "Downmix to Mono" in the Advanced Audio section of the Audio Mixer to force 1 channel audio to 2 channels.
- (3+ Channels) Surround source
- Ordered as Front Left, Front Right, Front Center, LFE/Sub, Rear Left (5.1), Rear Right (5.1), Side Left (7.1), Side Right (7.1)
- OBS Studio automatically downmixes surround sources to Stereo unless otherwise specified
Note: OBS Studio defaults to Stereo audio. This can be configured in the Audio section of the application Settings. You will only see volume meters up to the number of channels configured.
Indicators
- Bottom Dot (Static): Input level
- Live indicator of the volume meter's status (Green/Yellow/Red)
- Black Dot (Moving): VU-meter
- Shows 'sound pressure', a more accurate indicator of 'loudness'
- Main Line (Moving): Peak Program Meter
- Has a 'fall-off decay'. After sound stops the bar will slowly go down rather than displaying completely live data, until it reaches -60 dB (empty) or receives new, louder data
- The 'Audio Meter Decay Rate' (How quickly the bar goes down) can be changed in the Audio section of Settings
- Top Dot (Static/Moving): Peak
- Displays the loudest the meter has been in 20 seconds, a great way to see if you're clipping
Setting Audio Levels
There are a number of ways to configure an audio source's volume.
As you adjust the volume at each step of the process, listen to the device both as early as possible (some devices will have a 'headphone' output or a 'monitor' jack) and again when it hits OBS using Audio Monitoring via Edit->Advanced Audio Properties.
- Always start at the device in question.
- Microphones: check if it has a physical knob (usually labeled "Gain")
- Games/consoles: most game applications and gaming consoles have their own volume sliders usually hidden in a Settings/Options screen
- Physical mixers: these have individual gain knobs for their own sources, and a 'Master' before it's sent to your computer & OBS
- For other devices including audio interfaces, check their user manuals to see how to configure them, as they may require third party software by the manufacturer.
- Your Operating System (Windows, macOS, Linux, etc) also has its own volume sliders and mixer
- Note that some devices may have a 'safe zone' that is well below the 100% mark.
- In Windows for example, Control Panel->Hardware and Sound->Sound, under the Recording tab, select the device in question (like your mic) and click Properties. In the Levels tab, right click the % value and choose 'decibels'. You want this to be at (or around) 0.0dB for the least amount of clipping. It will retain the setting when you switch back to 'percent'.
- Your system's primary volume slider may affect the volume of the sound that OBS hears, you will need to test on your own system to verify this behavior
- Individual application volume sliders do affect the volume of the sound that OBS hears
- Note that some devices may have a 'safe zone' that is well below the 100% mark.
Finally, be sure to record a session as you normally would and then listen back to the file before going live.
- If you still feel the audio needs to be tweaked, now is the time to adjust the Fader within OBS.
- If you need something higher than the maximum, you can insert custom percentage (%) values that can go well above 100% using Edit->Advanced Audio Properties.
Other things to keep in mind:
- Microphones will naturally be quieter than anything computer generated – be it games, music or general sound effects. Take that into account when balancing your audio.
- Voice communication software like TeamSpeak, Discord and Mumble allow you to 'boost' the voice volume of other members (both overall and individual users) above the 100% mark if needed.
- Most games do not allow per-user volume control so keep this in mind when playing in a matchmaking system.