Aliasing Issue (4K webcam + 3840x2160 Monitor into 1920x1080 canvas)

Elektraman

New Member
I have a 4K webcam and 3840x2160 displays.
I do tutorials with desktop view and PIP (Picture In Picture i.e me!) which is fuzzy (aliasing issue) on output

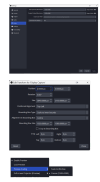
Base (Canvas) Resolution - 1920x1080
Output (Scaled) Resolution - 1920x1080
Common FPS Values - 60

I'm trying to resolve the aliasing issue (as it is rather bad). but:

1) Putting a 3840 x 2160 window capture onto a 1920x1080 canvas results in black bars either side
2) Setting BCR to 3840 x 2160 and downscaling to 1920x1080 givs aliasing issues (blurriness in PIP).

I need the sharpest possible picture of the desktop and also my PIP, any advice on how best to acheive this?

(Did think about using Display Fusion to split the monitor into 4 thus giving a virtual monitor of 1920x1080, but is there a better way?)
 

Suslik V

Active Member
Downsampling more than twice from high resolutions is not recommended in OBS. Filters algorithms has its own limitations.

Anyway, there are number approaches to get a bit sharper images in OBS even when images scaled down more than twice. For example, you can:
  1. Apply Transform to the source by mouse (drag any corner of the source);
    1.1 set Scaling Filtering > Bilinear (right-click menu over the source). Other values are useless here because you scaling down more than twice;​
    1.2 group the source (right-click menu over the source, Group Selected Items);​
    1.3 add new Filter named Sharpen with Sharpness value about 0.15 to the whole Group (from p1.2), not to the image but to the whole group.​
  2. Apply Transform to the source by mouse (drag any corner of the source) until source scaled down about x1.8 times (less than x2);
    2.1 Set Scaling Filtering > Bicubic (right-click menu over the source);​
    2.2 group the source (right-click menu over the source, Group Selected Items);​
    2.3 to the whole Group (from p2.2) add new Filter named Scaling/Aspect Ratio with Scale Filtering = Bicubic, Resolution = 1152x648 (here type manually about x1.8 times lower values);​
    2.4 select the Group source (from p2.2) in sources list and set Scaling Filtering > Bicubic (right-click menu over the source);​
    2.5 while the Group source still selected apply Transform to the source by mouse (drag any corner of the source) until source scaled down about x1.8 times again (less than x2).​
In the example #2 (see above) I scaled image from 3840x2160 down to 640x360 in few steps (3840x2160 -> 2048x1152{transform} -> 1152x648{filter} -> 640x360{transform}). Result image will be sharper and has more details than the straight down-scaling by single filter in one step.

Method from example #1 (see above) has very similar visual perception with insignificant differences. Result image will look sharper than the straight down-scaling without sharpen filter. Preferable method in case of moving pictures with a lot of small details because it produces less ridging.

Both methods keeps original source untouched, so reference copy of the original source can be used at its full resolution in other scenes (and with different transform).

Area filters will give you more smooth image (still use them at less than x2 down-scaling).
 

Elektraman

New Member
How it is even possible? Are you capturing borders of the window as well?
The window is maximised to the screen size (3840 x 2160) and then i use "Window Capture". Edit>transform confirms its it size as 3840 x 2160 and the canvas and bounding box as 1920x1080. My setup is very unusual, I have 3 of these monitors arrange in a half-hex setup thus 10ft wide monitor area.
 

Suslik V

Active Member
Bounding Box Size is not what you are looking for. You need real size of the source that is Size and Bounding Box Type = No bounds . Click Reset transform settings and change only Size.

Bounding box is for fitting sources into the fixed area of some "box" on the screen (usually needed when you capturing different 2d old games where rendering is fixed at some level: 3:4 or 16:9 etc).

Or maybe you need to provide screenshots of what you see in OBS, because it is hard to get what is going wrong in your setup.
 

Elektraman

New Member
Downsampling more than twice from high resolutions is not recommended in OBS. Filters algorithms has its own limitations.

Anyway, there are number approaches to get a bit sharper images in OBS even when images scaled down more than twice. For example, you can:
  1. Apply Transform to the source by mouse (drag any corner of the source);
    1.1 set Scaling Filtering > Bilinear (right-click menu over the source). Other values are useless here because you scaling down more than twice;​
    1.2 group the source (right-click menu over the source, Group Selected Items);​
    1.3 add new Filter named Sharpen with Sharpness value about 0.15 to the whole Group (from p1.2), not to the image but to the whole group.​
  2. Apply Transform to the source by mouse (drag any corner of the source) until source scaled down about x1.8 times (less than x2);
    2.1 Set Scaling Filtering > Bicubic (right-click menu over the source);​
    2.2 group the source (right-click menu over the source, Group Selected Items);​
    2.3 to the whole Group (from p2.2) add new Filter named Scaling/Aspect Ratio with Scale Filtering = Bicubic, Resolution = 1152x648 (here type manually about x1.8 times lower values);​
    2.4 select the Group source (from p2.2) in sources list and set Scaling Filtering > Bicubic (right-click menu over the source);​
    2.5 while the Group source still selected apply Transform to the source by mouse (drag any corner of the source) until source scaled down about x1.8 times again (less than x2).​
In the example #2 (see above) I scaled image from 3840x2160 down to 640x360 in few steps (3840x2160 -> 2048x1152{transform} -> 1152x648{filter} -> 640x360{transform}). Result image will be sharper and has more details than the straight down-scaling by single filter in one step.

Method from example #1 (see above) has very similar visual perception with insignificant differences. Result image will look sharper than the straight down-scaling without sharpen filter. Preferable method in case of moving pictures with a lot of small details because it produces less ridging.

Both methods keeps original source untouched, so reference copy of the original source can be used at its full resolution in other scenes (and with different transform).

Area filters will give you more smooth image (still use them at less than x2 down-scaling).
Many thanks, I tried the first option and the picture is a lot better, very useable! Your notes were a great help, thanks again!
 

Elektraman

New Member
Bounding Box Size is not what you are looking for. You need real size of the source that is Size and Bounding Box Type = No bounds . Click Reset transform settings and change only Size.

Bounding box is for fitting sources into the fixed area of some "box" on the screen (usually needed when you capturing different 2d old games where rendering is fixed at some level: 3:4 or 16:9 etc).

Or maybe you need to provide screenshots of what you see in OBS, because it is hard to get what is going wrong in your setup.
I've attached screenshots to show the setup of the window capture of 3840 x 2160 onto a canvas of 1920x1080
 

Attachments

  • Upload.png
    Upload.png
    178.4 KB · Views: 8

Suslik V

Active Member
It shouldn't produce any black bars until source size changes.
Size of 3840x2160 perfectly fits into 1920x1080 Bounding Box.
 

jsjoeio

New Member
Downsampling more than twice from high resolutions is not recommended in OBS. Filters algorithms has its own limitations.

Anyway, there are number approaches to get a bit sharper images in OBS even when images scaled down more than twice. For example, you can:
  1. Apply Transform to the source by mouse (drag any corner of the source);
    1.1 set Scaling Filtering > Bilinear (right-click menu over the source). Other values are useless here because you scaling down more than twice;​
    1.2 group the source (right-click menu over the source, Group Selected Items);​
    1.3 add new Filter named Sharpen with Sharpness value about 0.15 to the whole Group (from p1.2), not to the image but to the whole group.​
  2. Apply Transform to the source by mouse (drag any corner of the source) until source scaled down about x1.8 times (less than x2);
    2.1 Set Scaling Filtering > Bicubic (right-click menu over the source);​
    2.2 group the source (right-click menu over the source, Group Selected Items);​
    2.3 to the whole Group (from p2.2) add new Filter named Scaling/Aspect Ratio with Scale Filtering = Bicubic, Resolution = 1152x648 (here type manually about x1.8 times lower values);​
    2.4 select the Group source (from p2.2) in sources list and set Scaling Filtering > Bicubic (right-click menu over the source);​
    2.5 while the Group source still selected apply Transform to the source by mouse (drag any corner of the source) until source scaled down about x1.8 times again (less than x2).​
In the example #2 (see above) I scaled image from 3840x2160 down to 640x360 in few steps (3840x2160 -> 2048x1152{transform} -> 1152x648{filter} -> 640x360{transform}). Result image will be sharper and has more details than the straight down-scaling by single filter in one step.

Method from example #1 (see above) has very similar visual perception with insignificant differences. Result image will look sharper than the straight down-scaling without sharpen filter. Preferable method in case of moving pictures with a lot of small details because it produces less ridging.

Both methods keeps original source untouched, so reference copy of the original source can be used at its full resolution in other scenes (and with different transform).

Area filters will give you more smooth image (still use them at less than x2 down-scaling).
went with approach #1 and it helped improve the sharpness of the output a ton. thanks so much!
 
Top