- Supported Bit Versions
- 32-bit
- 64-bit
- Source Code URL
- https://github.com/DanAlbrecht214/Production-Scene-Timer-2.0
- Minimum OBS Studio Version
- 30.0.0
- Supported Platforms
- Windows
- macOS
- Linux
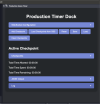
Production Timer Dock
This is a production tool that allows the production team to keep track of time being spent on a particular scene. This will aid in keeping a planned session on time from a delivery perspective.
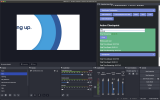
This tool can be used in OBS as a custom browser dock or you can simply open it as a webpage and it will work the same way. You also have the choice to use the OBS WebSocket or as a standalone
timer that you can manually utilize.
To use this tool complete the following steps.
Step 1.
Download this entire folder to your computer. Make note of where you save the folder. Do not remove any of the files in this folder as some of the files are used by the dock to function.
Step 2.
Open OBS and go to the Docks Menu and then click on Custom Browser Docks.
Step 3.
Enter a name for the Browser Dock. For Example, OBS Scene Timer.
Then for the URL, you need to get the path to the prod-timer-dock.html file.
Make sure the path when you enter it starts with file:///Users/.....
This will ensure that it loads in the custom dock correctly.
Step 4.
Once you have clicked apply, the Dock should appear in OBS. If nothing appears in the dock, make it wider. It seems to have a bit of an issue first loading into the size that you need.
How to use the Production Timer Dock.
This dock is integrated with the built in OBS WebSocket 5.4.2. You will see a button called "WebSocket Configuration". Clicking on this button will open a section of dock and expose a place to
enter the port for your WebSocket and a password (optional). To find this information about your OBS WebSocket, navigate to the Tools Menu in OBS and click on WebSocket Server Settings.
This will open up a window that shares with you your port and your password (if you have set that up). Clicking on Show Connect Info will show you all the details including the password.
After you have entered this information into the WebSocket Configuration, click on Connect WebSocket. If everything is setup properly, you should see a Status of Connected. Should this fail, it
will show Disconnected. Should this happen, go into the Dock in OBS, right click and choose Inspect. Then navigate to the console tab and review the messages in the console. This may shed light
on what is causing the issue.
While you have the option to use the WebSocket integration, it is not required. You could use this tool without connecting to the WebSocket. You will lose some functionality however in doing so.
This dock has been designed to pick up on scene changes and start and stop timers based on that transition. By not connecting to the WebSocket, you will need to manually Start checkpoints and also
click finish when the session is complete.
You will notice additional buttons in the UI. These are described below:
Add Checkpoint: This manually adds a checkpoint where you can add a Name and a duration for that particular checkpoint.
Load Checkpoints from OBS: This will take all the scenes in the current scene collection and make them checkpoints. You will need to manually add durations to these checkpoints. Don't worry, you
have the option to save this information for later use if you would like.
Reset: This button resets all timers and starts the process over again.
Save and Load: This produces a .json payload that is displayed in the JSON Output section of the page. Simply create a new file in your text editor (or VS Code) and save it as a .json file. When you load
the dock in the future, you can use the load button to navigate to the location of that file and click open and all the saved checkpoints will be loaded into the dock and ready for use.
Checkpoints: This section is a view into all of the checkpoints that have been loaded into the dock. This section is important because it will also show you an overview of each checkpoint and the
time spent on each one. When you are finished you should be able to go back and look to see where the most time was spent and if you went over the allowed duration. This gives you insight on where
changes may need to be made to the production to account for these overages.
Log: This section is simply a log of the events that took place and when they took place. Since you will be able to navigate away from a scene and back to that same scene you will have a log of
these events so you can understand how the flow actually took place during a session.
This is a production tool that allows the production team to keep track of time being spent on a particular scene. This will aid in keeping a planned session on time from a delivery perspective.
This tool can be used in OBS as a custom browser dock or you can simply open it as a webpage and it will work the same way. You also have the choice to use the OBS WebSocket or as a standalone
timer that you can manually utilize.
To use this tool complete the following steps.
Step 1.
Download this entire folder to your computer. Make note of where you save the folder. Do not remove any of the files in this folder as some of the files are used by the dock to function.
Step 2.
Open OBS and go to the Docks Menu and then click on Custom Browser Docks.
Step 3.
Enter a name for the Browser Dock. For Example, OBS Scene Timer.
Then for the URL, you need to get the path to the prod-timer-dock.html file.
Make sure the path when you enter it starts with file:///Users/.....
This will ensure that it loads in the custom dock correctly.
Step 4.
Once you have clicked apply, the Dock should appear in OBS. If nothing appears in the dock, make it wider. It seems to have a bit of an issue first loading into the size that you need.
How to use the Production Timer Dock.
This dock is integrated with the built in OBS WebSocket 5.4.2. You will see a button called "WebSocket Configuration". Clicking on this button will open a section of dock and expose a place to
enter the port for your WebSocket and a password (optional). To find this information about your OBS WebSocket, navigate to the Tools Menu in OBS and click on WebSocket Server Settings.
This will open up a window that shares with you your port and your password (if you have set that up). Clicking on Show Connect Info will show you all the details including the password.
After you have entered this information into the WebSocket Configuration, click on Connect WebSocket. If everything is setup properly, you should see a Status of Connected. Should this fail, it
will show Disconnected. Should this happen, go into the Dock in OBS, right click and choose Inspect. Then navigate to the console tab and review the messages in the console. This may shed light
on what is causing the issue.
While you have the option to use the WebSocket integration, it is not required. You could use this tool without connecting to the WebSocket. You will lose some functionality however in doing so.
This dock has been designed to pick up on scene changes and start and stop timers based on that transition. By not connecting to the WebSocket, you will need to manually Start checkpoints and also
click finish when the session is complete.
You will notice additional buttons in the UI. These are described below:
Add Checkpoint: This manually adds a checkpoint where you can add a Name and a duration for that particular checkpoint.
Load Checkpoints from OBS: This will take all the scenes in the current scene collection and make them checkpoints. You will need to manually add durations to these checkpoints. Don't worry, you
have the option to save this information for later use if you would like.
Reset: This button resets all timers and starts the process over again.
Save and Load: This produces a .json payload that is displayed in the JSON Output section of the page. Simply create a new file in your text editor (or VS Code) and save it as a .json file. When you load
the dock in the future, you can use the load button to navigate to the location of that file and click open and all the saved checkpoints will be loaded into the dock and ready for use.
Checkpoints: This section is a view into all of the checkpoints that have been loaded into the dock. This section is important because it will also show you an overview of each checkpoint and the
time spent on each one. When you are finished you should be able to go back and look to see where the most time was spent and if you went over the allowed duration. This gives you insight on where
changes may need to be made to the production to account for these overages.
Log: This section is simply a log of the events that took place and when they took place. Since you will be able to navigate away from a scene and back to that same scene you will have a log of
these events so you can understand how the flow actually took place during a session.