- Supported Bit Versions
-
- 32-bit
- 64-bit
- Source Code URL
- https://git.vrsal.cc/alex/tuna
- Minimum OBS Studio Version
- 28.0.0
- Supported Platforms
-
- Windows
- Linux

Tuna
Currently supports these music sources:
- Spotify (All song information (except for song label), including Cover art)
- MPD (All song information*, including Cover art)
- VLC Video source (All song information*, including Cover art)
- last.fm scrobbling Cover art, some song information)
- MPRIS and Windows Media control, i.e. most media players (Cover art, some song information)
- YouTube Music Desktop App (Cover art, some song information)
- Window title/process name (additional formatting, like cutting characters)
- Soundcloud, Yandex Music and Spotify Web Player via the tampermonkey script
How do I set this up?
To ensure that you get the most out of this plugin and get it set up correctly it's encouraged that you read through the following instructions thoroughly.
A basic part of this plugin is the ability of OBS to load both image and text files from disk. If you do not know how that works it is strongly recommended that you familiarize yourself with both the image and text source first:

 obsproject.com
 obsproject.com
obsproject.com
obsproject.com
The first step is to install the plugin for which you'll have to follow the installation steps for your platform:
After you've installed the plugin you should see a new option in the Tools menu:
 If it does not show up it means that either the plugin wasn't installed correctly or that OBS couldn't load it. In that case an obs studio log is necessary to help fix the issue.
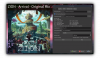
After you click on the menu this dialog will open:

Sources Guide
OBS Studio - Free and open source software for live streaming and screen recording - obsproject/obs-studio
obsproject.com
Wiki - Sources Guide | OBS
Table of Contents * [Scenes and Sources Overview](#scenes-and-sources-overview) * [Source Descriptions](#source-descriptions) * [Audio Input Capture](#audio-inputoutput-capture) * …
Wiki - Sources Guide | OBS
Table of Contents * [Scenes and Sources Overview](#scenes-and-sources-overview) * [Source Descriptions](#source-descriptions) * [Audio Input Capture](#audio-inputoutput-capture) * …
The first step is to install the plugin for which you'll have to follow the installation steps for your platform:
Windows
Either run the installer or follow these steps:
If you use a Debian based distro you can use the installer, all other distros currently have to either build the plugin from source or manually extract the binaries from the debian installer and move them into the correct folders, the latter approach might not work on all distros. If you use the flatpak version of obs I can't help you as I have no experience with it. There have been reports that the plugin does not load with the flatpak version.
Either run the installer or follow these steps:
- Open your obs-studio installation folder (eg. Right click on the shortcut and click "Open file location")
- Navigate two directories up
- Drop the contents of the zip file (a "data" and "obs-plugins" folder) into the obs-studio directory
- Merge the files
- Tuna should now show up in the tools menu of obs-studio
If you use a Debian based distro you can use the installer, all other distros currently have to either build the plugin from source or manually extract the binaries from the debian installer and move them into the correct folders, the latter approach might not work on all distros. If you use the flatpak version of obs I can't help you as I have no experience with it. There have been reports that the plugin does not load with the flatpak version.
After you've installed the plugin you should see a new option in the Tools menu:
After you click on the menu this dialog will open:
- This is the path to which Tuna saves the cover of the currently playing song. You can leave the default or change it via the "..."-button to a different path if you want. Just remember it later when you add an image source for the cover.
- If you uncheck this checkbox Tuna will not download the cover of the currently playing song
- If you check this option Tuna will attempt to look for covers by querying Apple's iTunes servers. This will use the album and artist of the currently playing song to search for matching album art. This means that the art that is found might not be exact. You can also choose the resolution that should be downloaded.
- If this option is enabled Tuna will remove file extensions from song titles (e.g. .mp3, .wav, .flac etc.). This is useful if you play music through the VLC Source and the songs do not have any metadata saved. In that case VLC will use the entire filename as the title, including the file extension.
- With these buttons you can add, remove and edit format outputs. They'll be described shortly.
- Enable this option if you want to use the user script which allows Tuna to receive song information from your web browser or if you want to use the browser widget.
- All output text files will contain this text if nothing is playing
- Here you can switch between the different supported music sources. Tuna will use the selected one to look for the currently playing song.
- This is the rate at which Tuna will refresh song information
- With these buttons you can start and stop Tuna. If the plugin is stopped it will not look for song information and it will not update the outputs.
What are song outputs?
Since the information is displayed through text sources, which read text from files on your computer you have to configure Tuna to tell it to create these text files and what should be in them. In the main dialog under the "Basics" Tab you can add, edit and remove outputs:

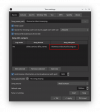
Adding or editing outputs will show this dialog:

The first option defines where the information is going to be saved. Click the "..."-button to select a file path. After that you have to define what information the text file is going to contain. The dialog gives you all options that are supported by Tuna, but keep in mind that not every music source provides all information.
If you want to display the artist and the song title you would enter "{artists} - {title}" into the textbox at the bottom without the quotes. {artists} and {title} will be replaced by the artists and the title of the currently playing song. So the text file would for example contain "Rick Astley - Never Gonna Give You Up". If a song features multiple artists it will list all of them separated by commas (provided that the music source provides all artists). If you only want the first artist to show up you would use {first_artist}. If you use a formatting option that isn't supported by the currently selected music source the plugin will notify you.
The plugin also has the option to capitalize all letters. If you use {TITLE} instead of {title} the file would contain "Rick Astley - NEVER GONNA GIVE YOU UP". You can also limit formatting options to a certain amount of characters. {TITLE:10} would make sure that the song title will be cut off after ten characters so the file would contain "Rick Astley - NEVER GONN...".
If the "Chat log mode" option is enabled Tuna will append the currently playing song at the end of the file so if you are currently paying "Never Gonna Give You Up" and then switched to "Whenever You Need Somebody" the file would contain:
When you've set up the output click "OK" to save it. Then click "Apply" in the main dialog to apply the changes.
Adding or editing outputs will show this dialog:
The first option defines where the information is going to be saved. Click the "..."-button to select a file path. After that you have to define what information the text file is going to contain. The dialog gives you all options that are supported by Tuna, but keep in mind that not every music source provides all information.
If you want to display the artist and the song title you would enter "{artists} - {title}" into the textbox at the bottom without the quotes. {artists} and {title} will be replaced by the artists and the title of the currently playing song. So the text file would for example contain "Rick Astley - Never Gonna Give You Up". If a song features multiple artists it will list all of them separated by commas (provided that the music source provides all artists). If you only want the first artist to show up you would use {first_artist}. If you use a formatting option that isn't supported by the currently selected music source the plugin will notify you.
The plugin also has the option to capitalize all letters. If you use {TITLE} instead of {title} the file would contain "Rick Astley - NEVER GONNA GIVE YOU UP". You can also limit formatting options to a certain amount of characters. {TITLE:10} would make sure that the song title will be cut off after ten characters so the file would contain "Rick Astley - NEVER GONN...".
If the "Chat log mode" option is enabled Tuna will append the currently playing song at the end of the file so if you are currently paying "Never Gonna Give You Up" and then switched to "Whenever You Need Somebody" the file would contain:
When you've set up the output click "OK" to save it. Then click "Apply" in the main dialog to apply the changes.
How do I display the information?
After you've setup the cover path and the song outputs it's time to setup the music source. Here you can find tutorials for the supported sources:
If the information refreshes slowly, you'll have to use your own API Credentials:
To use the Spotify source follow these steps:
If you continuously experience login issues, make sure that
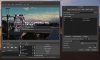
Now that you've setup the correct output and selected it in the basics tab you can add an image source for the cover:

and as many text sources as you have configured song outputs:

You can also drag and drop text and image files into obs studio to automatically create the sources.
- Click on "Tools" at the top of the obs window
- Select "Tuna settings"
- Select "Spotify" as the music source
- Select the "Spotify" tab
- Click "Open login page" and accept the info message (might also wanna read it)
- Verify the URL, login and grant access
- Copy the code into the "Authentication code" field
- Click "Request token"
- That should be it, if there were errors they will be logged in the textbox under "Response log"
If you continuously experience login issues, make sure that
- You have the latest version
- The Spotify servers aren't down or the API isn't rate limited (you can check by looking at the obs studio log)
- You cleared your cookies for the login page univrsal.github.io (using incognito mode also works)
- Click on "Tools" at the top of the obs window
- Select "Tuna settings"
- Select "MPD" as the music source
- Select the "MPD" tab
- Enter the MPD server IP and port (or select local connection)
Only works with VLC >=3.0.0
- Click on "Tools" at the top of the obs window
- Select "Tuna settings"
- Select "VLC" as the music source
- Select the "VLC" tab
- (Click refresh if your source doesn't show up)
- Select the scene from the drop-down menu
- Select the VLC source from the drop-down menu
- Click add
- Click on "Tools" at the top of the obs window
- Select "Tuna settings"
- Select "Web browser" as the music source
- Make sure that "Host/receive infromation on local webserver with port:" is checked
- Enable the tuna plugin in the youtube music application
- Click on "Tools" at the top of the obs window
- Select "Tuna settings"
- Select "MPRIS" or "Windows Media Control" as the music source
- Click on "Tools" at the top of the obs window
- Select "Tuna settings"
- Select "Window title" as the music source
- Select the "Window title" tab
- Enter any search term (e.g. Firefox, to search for any window that contains the word Firefox)
- Optionally add a search and replace term and/or cut the first or last characters
- Click on "Tools" at the top of the obs window
- Select "Tuna settings"
- Select "last.fm" as the music source
- Select the "last.fm" tab
- Enter your last.fm user name and if you have it your own api key
Basically just enter the server url and make sure that the server provides information via a status-json.xsl.
Now that you've setup the correct output and selected it in the basics tab you can add an image source for the cover:
and as many text sources as you have configured song outputs:
You can also drag and drop text and image files into obs studio to automatically create the sources.
How do I change the placeholder cover?
The placeholder image is saved under
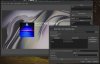
C:\Program Files\obs-studio\data\obs-plugins\tuna\placeholder.png or ~/.config/obs-studio/plugins/tuna/data/placeholder.png. It can be replaced with a transparent png if you don't want anything to show when nothing is playing.How do I keep the cover art consistently sized?
Modify the bounding box type to "Scale to inner bounds". Other scaling types might also work for you, but the default of "No bounds" means that the image source will change its size to whatever image is currently loaded. Additionally you might wan to change the positional alignment to "Center". To change the type select the cover image source, press Ctrl+E and then change the dropdown:

Additional features

There's also a lyrics (lyrics.htmi) overlay which will display synchronized lyrics via Musixmatch. The music source has to provide the current progress (Spotify, VLC, MPD or Web Browser) of the song for this to work.